
The Tesla Wall Connector must be permanently hardwired to a dedicated 200–240 V circuit sized and protected per code, with proper grounding and installation by a qualified electrician. There’s no version of this install that works with a standard outlet or a DIY extension cord setup. Breaker sizing has to follow NEC continuous-load derating rules, and the unit won’t even charge your car until it passes its own internal ground assurance test.
TL;DR:
- The installation must include a dedicated 200–240 V circuit with proper grounding, sized according to NEC rules, and performed by a qualified electrician; DIY setups are not permitted.
- A 48 A output requires a 60 A breaker and 6 AWG copper conductors, while lower outputs like 32 A or 40 A need appropriately sized breaker and wire, considering voltage drop over long runs.
- Mounting location should allow cable reach without stretching, with weatherproofing through proper conduit fittings and seals, especially for outdoor or exposed sites.
- Permits are usually necessary, and an inspection will verify circuit dedication, breaker and conductor sizes, grounding, and weatherproofing standards; local rules may vary, especially regarding disconnects.
- Most homeowners should program the Wall Connector for 32 A or 40 A overnight charging, saving full capacity for households with multiple EVs or higher onboard chargers, and can upgrade later if needed.
Table of Contents
- Tesla Wall Connector Requirements: Specs You Need to Plan Around
- Wire Sizing and Breaker Selection: The Math Behind the Install
- Site Prep and Installation Steps Worth Knowing Before the Electrician Arrives
- Permits, Inspections, and Code Considerations
- Grounding, Earth Assurance, and Commissioning Troubleshooting
- Why a Qualified Installer Matters for This Job
- Local Utility and HOA Approval: What to Check First
- How Far Can the Wall Connector Be From Your Panel?
- Which Electrical Panels Work With a Wall Connector?
- Setting Up Firmware and Wi-Fi After Installation
- Safety Considerations and Installation Mistakes to Avoid
- Recommended Amperage for Most Homeowners
- Get a Professional Wall Connector Install Through Alphasolarsa
- Sources
- FAQ
Tesla Wall Connector Requirements: Specs You Need to Plan Around
Every Tesla Wall Connector requirement traces back to one fact: this is a hardwired appliance, not a plug-in accessory. The Gen 3 Wall Connector runs on nominal 200–240 V single phase power and carries a Type 3R enclosure rating, which means it’s built to handle rain, dust, and the kind of heat San Antonio summers throw at outdoor equipment. It’s rated for use between negative 22°F and 122°F, so both garage and exterior wall mounting work.
The current output is programmable, not fixed. An electrician sets it anywhere from 12 A to 48 A during commissioning, and that number determines nearly every other decision in the install: breaker size, wire gauge, and sometimes whether your existing panel has enough room to spare.
Here’s what else defines the equipment side of the job:
- Terminal block capacity: The wirebox accepts copper conductors ranging from 12 AWG to 4 AWG (3.5 to 25 mm²). Aluminum conductors aren’t accepted at the terminals.
- Conduit sizing: Standard installs use 3/4 inch conduit, with 1 inch available as an option for longer runs or thicker gauge wire.
- Included cable length: The unit ships with a 24 foot (7.3 meter) charging cable, which matters when you’re figuring out where to mount it relative to your parking spot.
- Physical footprint: The enclosure measures roughly 13.6 inches tall, 6.1 inches wide, and 5.9 inches deep, and weighs about 13 pounds with the wirebox attached.
None of these specs live in isolation. If you’re aiming for the full 48 A output, Tesla’s breaker guidance calls for a 60 A breaker and heavier conductors than a 32 A setup would need. One detail that surprises a lot of new owners: your car’s onboard charger, not the Wall Connector, often becomes the real bottleneck. A vehicle with a 32 A onboard charger will never pull more than that from a 48 A capable unit, no matter how the electrician programs it. That’s worth knowing before you pay for oversized wire you’ll never fully use.
The practical takeaway is that spec sheets don’t hand you a single answer. They hand you a range, and your electrician’s job is picking the right point on that range based on your car, your panel, and your budget. A homeowner charging a Model 3 overnight has very different needs than someone running two Wall Connectors for a Model X and a Cybertruck off the same panel.
Wire Sizing and Breaker Selection: The Math Behind the Install
The single most important rule governing Tesla Wall Connector requirements for wiring is the National Electrical Code’s 125% continuous-load rule. EV charging counts as a continuous load because it runs for hours at a stretch, and the code requires breakers and conductors to be sized at 125% of the maximum continuous current draw. That safety margin prevents heat buildup on a circuit that’s working nonstop for a three-hour charging session, not a quick five-minute burst.
Here’s how that math plays out in practice:
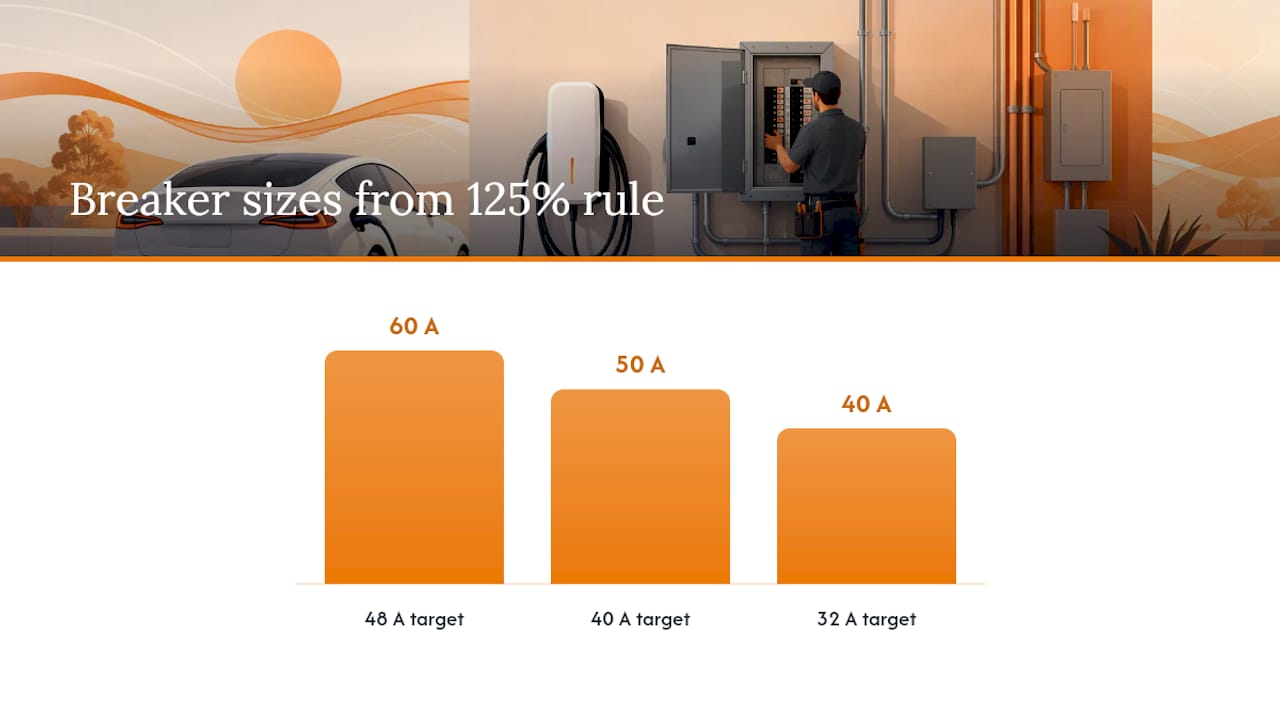
- 48 A output target: Multiply 48 by 1.25, and you get 60. A 48 A Wall Connector output needs a 60 A breaker, which is exactly what Tesla’s own breaker table specifies.
- 40 A output target: 40 times 1.25 equals 50, so a 50 A breaker covers it.
- 32 A output target: 32 times 1.25 comes out to 40, matching a standard 40 A breaker.
Wire gauge follows the breaker size, not the other way around. A 60 A breaker circuit typically calls for 6 AWG copper conductors, a 50 A circuit generally runs on 6 AWG or 8 AWG depending on run length, and a 40 A circuit commonly uses 8 AWG. Shorter runs sometimes allow 10 AWG on lower amperage setups, but that’s a call your electrician makes after checking the distance and insulation rating. If you’re using stranded wire below 4 mm² (roughly 10 AWG or smaller), Tesla recommends ferrules to get a solid terminal connection rather than relying on loose strands under a screw terminal.
Long conductor runs introduce a second variable most people overlook: voltage drop. If your panel sits 80 or 100 feet from where you want the Wall Connector mounted, the resistance in that extra wire length can drag down the voltage enough to matter, particularly at higher amperage. The fix is either upsizing the conductor gauge for that run or using the unit’s programmable output to dial down the amperage and stay within a safer voltage-drop margin. That second option is often cheaper and just as effective for daily charging needs. Our guide on NEMA 6-50 vs. 14-50 circuits breaks down how the 125% rule interacts with common outlet and breaker choices if you want a deeper comparison.
Pro Tip: If your panel is nearly maxed out, ask your electrician about programming the Wall Connector down to 32 A or 24 A instead of paying for a full panel upgrade. Most Tesla vehicles still charge a full battery overnight at that rate, and you can always reprogram the unit later if your panel gets upgraded for other reasons.
Site Prep and Installation Steps Worth Knowing Before the Electrician Arrives
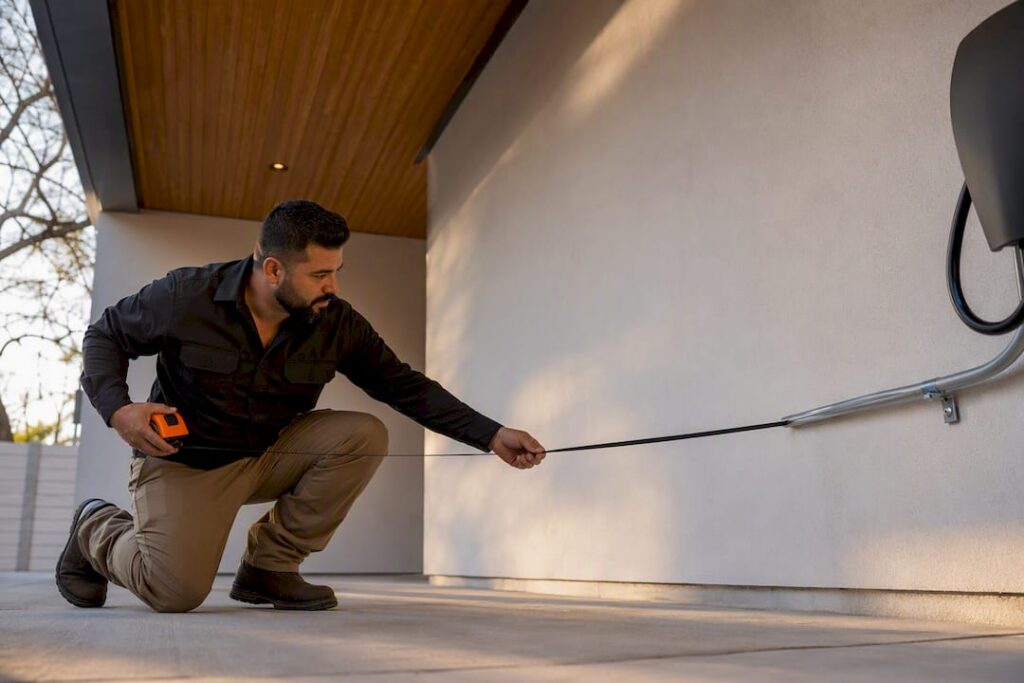
Mounting location decisions come down to two things: reach and weather exposure. With a 24 foot charging cable, the Wall Connector needs to sit close enough to your parking spot that the cable comfortably reaches the charging port without stretching or dragging on the ground. Most installers mount it between waist and shoulder height, both for comfortable cable handling and to keep the unit clear of standing water or snow accumulation.
Outdoor installs lean on that Type 3R rating, but weatherproofing still depends on execution. Conduit fittings need proper bushings, and any wirebox penetration into an exterior wall should use watertight sealant, not just a friction fit. Our breakdown of outdoor EV charger installation covers the specific fittings that hold up over years of Texas heat and rain rather than degrading after one season.
A typical on-site sequence looks like this:
- Confirm mounting location, cable reach, and clearance from grade or moisture sources.
- Run conduit and conductors from the panel, sized per the breaker selected earlier.
- Terminate conductors in the wirebox, torque terminals to spec, and secure the enclosure to the wall.
- Energize the circuit and set the maximum output amperage through the Wall Connector’s onboard configuration.
- Perform the ground assurance test to confirm the earth path is solid before handing the unit off.
- Connect the Wall Connector to Wi-Fi for firmware updates and power-management features.
That last step gets skipped more often than it should. Without Wi-Fi, you lose access to firmware updates and any power-sharing features if you ever add a second charger.
Permits, Inspections, and Code Considerations
Most jurisdictions require a permit for a hardwired 200–240 V circuit addition, and Wall Connector installs are no exception. Skipping that step isn’t just a legal risk. It can also complicate insurance claims or resale disclosures down the line if an unpermitted circuit ever causes a problem.
Inspectors generally focus on a short list of items:
- Confirming the circuit is dedicated, meaning nothing else shares that breaker.
- Verifying breaker and conductor sizes match the 125% continuous-load calculation.
- Checking grounding and bonding back to the main earthing point.
- Confirming the wirebox and conduit meet local weatherproofing and mounting standards.
One point of frequent confusion involves disconnects. Tesla’s own guidance states that external disconnects are neither required nor recommended for the Wall Connector, since the branch circuit breaker itself already functions as the means of disconnect. That said, local code sometimes overrides manufacturer preference. Some jurisdictions still want a visible disconnect within sight of the unit, particularly for detached garages or outbuildings. A licensed electrician familiar with your specific authority having jurisdiction will know which rule wins in your area, and it’s worth confirming before the rough-in stage rather than after the inspector flags it.
The 125% rule isn’t optional paperwork, either. It’s the calculation inspectors check first, and getting it wrong at the quoting stage is the fastest way to fail an inspection and re-schedule a job.
Grounding, Earth Assurance, and Commissioning Troubleshooting
Grounding is where a lot of otherwise solid installs run into trouble. The Wall Connector requires an equipment-ground conductor run alongside the circuit conductors, properly bonded back to the site’s main earthing point. This isn’t a courtesy connection. The unit actively performs a ground assurance test before allowing any charging session to start, and if that earth path is inadequate, the Wall Connector simply refuses to charge and throws a fault indicator instead.
Grounding quality deserves attention during the initial site survey, not as an afterthought during commissioning. Older homes with aluminum grounding conductors, loose ground rods, or bonding jumpers that were never properly tightened are common culprits behind failed ground assurance checks.
If commissioning throws a fault, work through this checklist before calling it a bigger problem:
- Recheck terminal tightness at both the panel and the wirebox. Loose lugs are the most common cause of intermittent faults.
- Confirm the conductor gauge actually matches what the breaker size requires, since an undersized ground wire will trip the same assurance check as a missing one.
- Test bonding and ground continuity from the wirebox back to the main earthing point with a multimeter, not a visual inspection alone.
- If the fault persists after all of that checks out, it may point to a utility-side grounding issue that needs a service call rather than a rewiring job.
Pro Tip: Test your grounding continuity before you run the final conductors, not after. Catching a bad ground rod or corroded bonding jumper during the site survey saves an entire re-inspection trip later.
Why a Qualified Installer Matters for This Job
Tesla’s own product listing states plainly that the Wall Connector must be installed by a qualified electrician, and that’s not just a liability disclaimer. Getting the breaker math, grounding, and conduit sizing wrong risks a failed inspection, a warranty dispute, or a genuine fire hazard.
Alphasolarsa handles full-service solar, battery, and EV charger installations across San Antonio, TX and the surrounding area, and a professional quote typically covers a site survey, load calculation, permit handling, wiring and conduit work, and final commissioning. That’s the same set of steps outlined above, done by people who do it every week instead of once.
Local Utility and HOA Approval: What to Check First
Most electric utilities don’t require pre-approval for a single Wall Connector install, since it’s treated as a standard residential circuit addition rather than a major service change. That said, if your panel needs a service upgrade to support the new circuit, your utility may need to inspect or upgrade the meter connection, which can add a few weeks to the timeline depending on scheduling.
Homeowners associations are a different story, and one that catches people off guard more often than utility rules do. Some HOAs have architectural review requirements for anything visible from the street, including exterior-mounted charging equipment. If your Wall Connector is going on a front-facing garage wall or an exposed exterior surface, check your HOA’s covenants before the electrician shows up. Garage-interior installs typically sidestep this issue entirely since nothing is visible from outside.
A growing number of states have laws limiting how much an HOA can restrict EV charging equipment specifically, treating it similarly to solar access laws. Texas doesn’t have a statewide EV charging protection statute as sweeping as some other states, so it’s worth reading your specific HOA documents rather than assuming a blanket right to install. A quick email to your HOA board before the install date is a cheap way to avoid a dispute after the conduit is already in the wall.
How Far Can the Wall Connector Be From Your Panel?
There’s no hard maximum distance written into Tesla’s specifications, but practical limits show up fast once voltage drop and cost enter the picture. The farther the run, the thicker and more expensive the conductor needs to be to maintain safe voltage at the Wall Connector, and beyond a certain point, upsizing wire stops being cost-effective compared to other options.
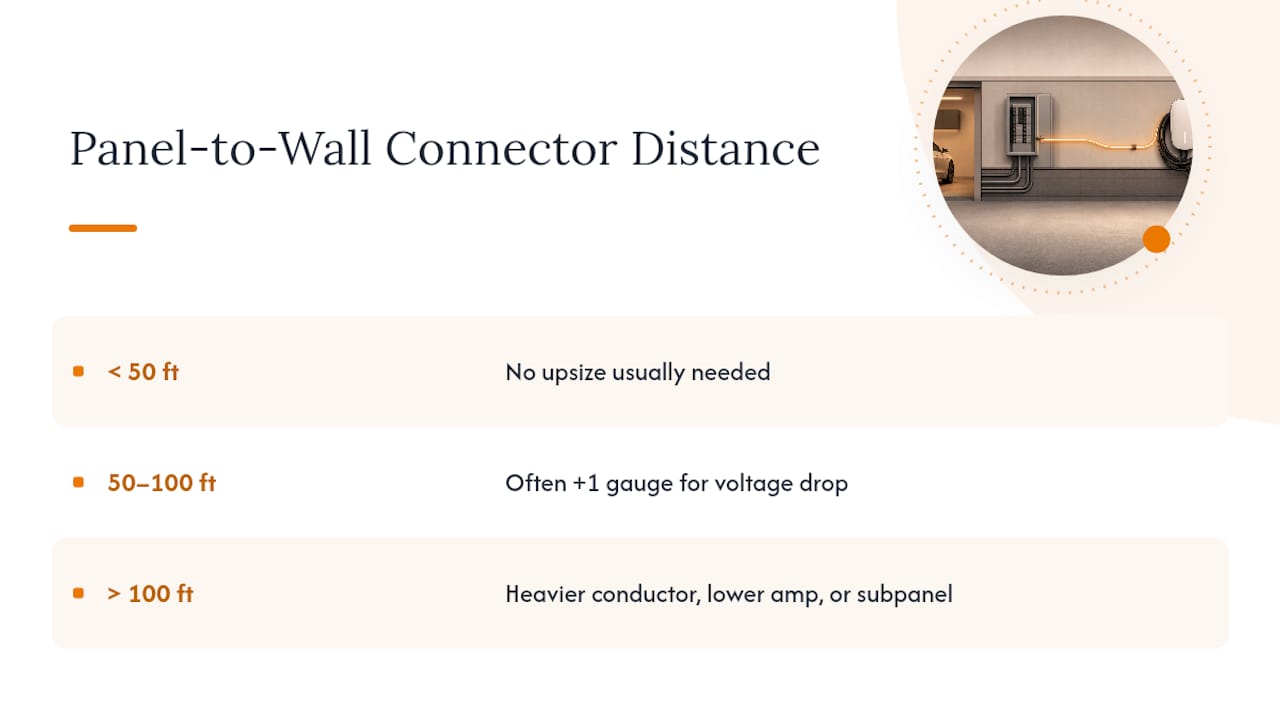
As a rough guide, most residential installs keep the panel-to-Wall Connector run under 50 feet without needing to upsize beyond what the amperage alone would require. Runs between 50 and 100 feet often need one gauge size larger than the breaker table would otherwise call for, specifically to offset voltage drop rather than to handle more current. Past 100 feet, an electrician typically recommends either a heavier conductor, a lower programmed amperage, or in some cases a subpanel installed closer to the Wall Connector’s mounting location to shorten the final run.
That last option is worth mentioning because it flips the usual assumption. Instead of running one long, expensive circuit from the main panel to a garage or driveway far away, some installers run a shorter, cheaper feeder to a small subpanel near the parking area, then a short dedicated circuit from there to the Wall Connector. It’s a design decision your electrician should weigh during the site survey, not something to decide after conduit is already purchased.
Which Electrical Panels Work With a Wall Connector?
The Wall Connector doesn’t care whether it’s fed from a main breaker panel or a properly installed subpanel, as long as that panel has the available capacity and a dedicated slot for the new circuit. Main panels are the most straightforward option when there’s open breaker space and enough total amperage headroom left after accounting for existing loads.
Subpanels come into play in two common scenarios: when the main panel is full, or when the Wall Connector’s location is far from the main panel and a subpanel shortens the run. Either way, the subpanel itself needs to be fed by a conductor sized for its total combined load, not just the Wall Connector alone.
Older load centers, particularly panels from before the 1990s with limited total amperage capacity, are where problems show up most. A 100 A main panel that’s already running a full house of appliances, HVAC, and a water heater may not have 40 to 60 A of spare capacity for a Wall Connector without a service upgrade. This is exactly the kind of load calculation a qualified electrician performs before quoting the job, and it’s why panel capacity gets checked before conductor size, not after. If you’re installing a second Wall Connector for a multi-EV household, each unit needs its own dedicated branch circuit and breaker. Power-sharing configurations between two units are possible but require additional setup that should be planned during that same initial site survey.
Setting Up Firmware and Wi-Fi After Installation
Once the Wall Connector passes its ground assurance test and starts charging normally, the last step is connecting it to Wi-Fi. This isn’t cosmetic. Firmware updates delivered over Wi-Fi patch bugs, add features, and sometimes adjust charging behavior for compatibility with newer Tesla vehicles or software changes on the car’s side.
Setup happens through the Tesla mobile app, where the Wall Connector shows up as a nearby device once it’s powered on. The app walks through network selection and password entry, and once connected, the unit checks for available firmware automatically. For households running solar and battery systems alongside their EV charging setup, Wi-Fi connectivity also unlocks power-management features that can coordinate charging times with solar production or off-peak utility rates.
Skipping this step doesn’t stop the Wall Connector from working. It just leaves it running whatever firmware version it shipped with, which can eventually cause compatibility hiccups as Tesla rolls out vehicle software updates that assume a current charger firmware version. It’s a five-minute task that’s easy to forget once the electrician packs up, so it’s worth doing that same day while the setup is fresh.
Safety Considerations and Installation Mistakes to Avoid
The most common installation mistake isn’t electrical at all. It’s mounting location. Installers sometimes place the Wall Connector based on convenience rather than cable reach, only to discover the 24 foot cable barely reaches the charging port on one side of the vehicle. Measuring twice before drilling once applies literally here.
On the electrical side, undersized grounding is the recurring theme. A ground conductor that’s technically present but undersized for the circuit will often pass a casual glance but fail the Wall Connector’s internal earth assurance test, leading to a frustrating troubleshooting call after the drywall is already patched.
Another frequent pitfall involves breaker selection based on wishful thinking rather than actual math. Some installers size the breaker for the Wall Connector’s maximum theoretical 48 A output, even when the vehicle’s onboard charger caps out at 32 A or 40 A. That’s not dangerous, but it does mean paying for heavier wire and a bigger breaker than the actual use case requires. Matching the circuit to real-world charging needs, with some headroom for a future vehicle upgrade, tends to be the smarter financial call.
Loose terminal connections round out the list of avoidable errors. Torque specs exist for a reason, and a wirebox terminal that’s under torqued can create resistance, heat, and eventually a nuisance fault or, worse, a fire risk over years of continuous high-current use.
Recommended Amperage for Most Homeowners
For most single-Tesla households, programming the Wall Connector to 32 A or 40 A covers overnight charging comfortably without pushing your panel to its limit. Save the full 48 A setup for households planning a second EV or a vehicle with a higher-capacity onboard charger.
If your panel is already tight on capacity, programming a lower amperage now and revisiting a panel upgrade later is usually the more practical financial move than forcing a bigger circuit today.
— Anthony
Get a Professional Wall Connector Install Through Alphasolarsa
For Tesla owners looking to avoid managing breaker math and grounding checks themselves, hiring a licensed team can ensure a direct, code-compliant installation process covering everything from load calculation to final commissioning.
A typical quote covers a site visit to assess your panel and mounting location, a load calculation to confirm available capacity, permit handling with your local jurisdiction, and the actual wiring, conduit work, and commissioning once everything’s approved. If your project also involves working around existing solar panels, Alphasolarsa’s team can coordinate that access as part of the same visit. Request a quote through the EV charger installation page to get a site assessment scheduled and find out what your specific panel and parking setup will need.
Sources
- Tesla Gen 3 Wall Connector installation guide (Type 3R / install requirements)
- Gen 3 Wall Connector installation manual (product PDF) — grounding and commissioning
FAQ
What Are the Electrical Requirements for a Tesla Wall Charger?
The Wall Connector needs a dedicated hardwired 200–240 V single-phase circuit, sized per the NEC’s 125% continuous-load rule, with proper grounding and copper conductors terminated by a qualified electrician.
Can I Use a 50 Amp Breaker for a Tesla Wall Charger?
Yes, a 50 A breaker works if the Wall Connector is programmed to a 40 A maximum output, since 40 A times 1.25 equals the 50 A rating required under the continuous-load rule.
Do I Need 6 AWG or 8 AWG Wire for a Tesla Charger?
It depends on the programmed output: a 48 A setup with a 60 A breaker typically needs 6 AWG copper, while a 40 A setup with a 50 A breaker often works with 6 AWG or 8 AWG depending on run length.
Do I Need a Permit to Install a Tesla Wall Connector?
Most jurisdictions require a permit for this type of dedicated circuit addition, and inspectors will check breaker sizing, conductor gauge, and grounding before signing off.
Does the Tesla Wall Connector Need an External Disconnect?
Tesla’s own guidance says external disconnects aren’t required or recommended since the branch circuit breaker serves that function, though some local authorities having jurisdiction may still require one.