There is no single installation time for a Level 2 EV charger: the schedule depends on your electrical panel, wiring route, required approvals and final testing. Separate the electrician’s time at your home from the date the charger is cleared and ready to use—those are different milestones.
- How long does Level 2 EV charger installation take? Your electrical scope and approval requirements determine the schedule.
- An existing suitable circuit reduces work; panel changes and trenching add separate tasks.
- Alpha Solar Solutions offers EV charger installation for San Antonio homeowners seeking a local contractor.
- Request separate milestones for installation, inspection when required, and first charging.
Why this matters
Your vehicle delivery date is not an electrical installation deadline. Before you arrange work or change your charging routine, establish what the installer must finish and whether another party must approve it.
Alpha Solar Solutions is a local EV charger installation option for San Antonio homeowners who want to discuss charging alongside solar and battery backup. You can request a free consultation to discuss the installation scope rather than rely on a generic time estimate.
For a 2026 project, ask for a written schedule tied to your property. A useful estimate identifies the work, the dependencies and the point when you can begin charging.
How long does Level 2 EV charger installation take?
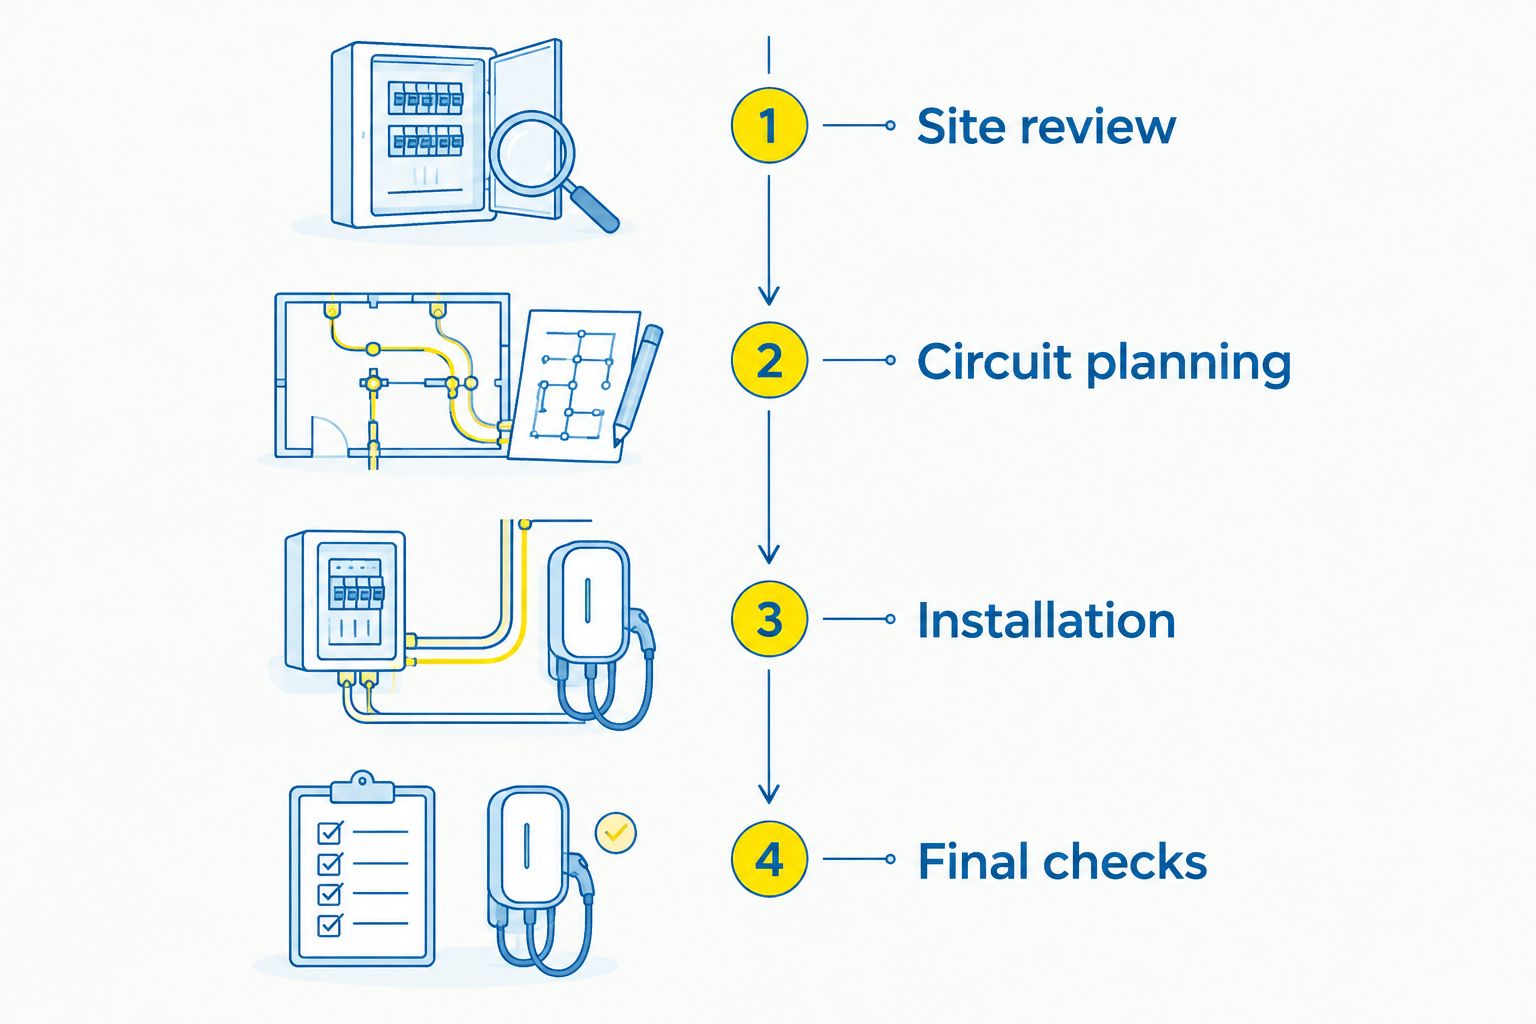
The installation schedule follows the work your property needs. Ask the contractor to divide the project into these stages:
- Site review: Check the electrical panel, proposed parking position and route between them.
- Circuit planning: Determine the circuit requirements, electrical capacity and applicable approval process.
- Installation: Complete the approved wiring, mounting, connections and any associated electrical work.
- Final checks: Test operation, complete required inspections and explain normal use.
These stages describe the sequence, not a promise that each requires a separate visit. The key question is which stages your quoted appointment includes.
Compare the work, not just the appointment length
A charger mounted beside a suitable electrical panel presents a different project from one serving a detached garage. Use the comparison below to identify the scope closest to your property; it is not a substitute for an electrical assessment.
| Installation scope | Best for | Scheduling advantage | Limitation or added task |
|---|---|---|---|
| Verified suitable existing circuit | Homeowners with an appropriate circuit at the parking location | Avoids installing a new circuit if the existing one meets requirements | An electrician must verify suitability; outlet appearance is not proof |
| New circuit near the panel | Parking close to an accessible panel with adequate capacity | Keeps the wiring route relatively direct | Still requires circuit installation, testing and applicable approvals |
| Long route or detached parking | Homeowners whose parking is away from the panel | Places charging where the vehicle actually parks | Routing, exterior work or trenching expands the scope |
| Panel or service changes | Homes where the assessment identifies inadequate capacity or equipment | Addresses electrical constraints before charging begins | Adds work and potentially coordination beyond charger mounting |
Choose the installation that fits your parking and electrical system, not the shortest advertised appointment. Moving the charger to an inconvenient location solely to shorten installation can leave you with a daily problem.
Existing circuit: verify it before setting the date
An existing outlet or circuit does not establish that your home is ready for the proposed charger. The electrician needs to check the circuit, protective devices, connections and compatibility with the selected equipment.
Residential Level 2 charging commonly uses 240 volts, while standard Level 1 charging uses 120 volts. A household outlet used for basic charging therefore does not establish readiness for a Level 2 installation.
Send clear photographs of the panel and proposed charger location before the assessment if the contractor requests them. Do not remove the panel cover or expose wiring yourself.
For your 2026 installation, ask whether the existing circuit has been accepted for reuse or is simply awaiting review. That distinction determines whether the schedule includes new wiring.
New circuit: the wiring route defines the work
A new circuit involves more than attaching a charger to the wall. The route must connect the electrical panel to the charging location using an installation method appropriate for the building and equipment.
Accessible walls and a direct route simplify the physical scope. Finished spaces, exterior walls and detached parking introduce different routing decisions and repair responsibilities.
Ask to see the proposed route before you approve the work. Confirm where wiring will be visible, where the installer expects to make penetrations and who handles any surface repairs.
If the proposal includes excavation, review the guide to EV charger installation with long cable runs and trenching. Your schedule should account for that work rather than treating it as part of mounting the charger.
Panel changes: resolve capacity before promising completion
Empty breaker spaces do not prove that your electrical system can support the intended charging load. Electrical capacity and physical room for a breaker are different questions.
As an electrical sizing example, a charger configured for 48 amps of continuous charging ordinarily requires a 60-amp circuit. Those figures illustrate why the charger setting and circuit design must agree; they are not a recommendation for your home.
Ask the electrician whether the proposed design needs panel work, service changes or a compatible load-management approach. Load management means controlling charging demand so it stays within the electrical limits established for the installation.
Do not accept a completion date that assumes this question is already settled. The capacity assessment belongs before the final installation commitment, not after the charger arrives.
Why Level 2 EV charger installation time varies
The following factors change the scope behind the schedule. Ask the contractor to identify which ones apply rather than adding a general allowance for every possible complication.
- Electrical capacity: The assessment determines whether the existing system supports the proposed charging load or needs additional work.
- Wiring distance: A longer route requires more installation work than a short, accessible connection beside the panel.
- Building access: Finished walls, restricted work areas and detached structures affect how the electrician reaches the charging location.
- Groundwork: Trenching and restoration are separate tasks from electrical connections and charger mounting.
- Approval requirements: Permits, inspections and utility involvement, where applicable, introduce milestones outside the installer’s on-site work.
- Equipment requirements: The charger’s installation instructions, connection method and configured current determine the required electrical setup.
For San Antonio projects in 2026, have the contractor confirm the requirements for your address. Do not transfer a neighbor’s inspection experience or appointment length to your property without checking the scope.
Does hardwired or plug-in installation finish sooner?
Neither connection method is automatically faster. A plug-in charger still needs a suitable receptacle and circuit, while a hardwired charger connects directly to the electrical wiring.
| Connection method | Best for | Practical benefit | Limitation |
|---|---|---|---|
| Hardwired | Homeowners choosing a fixed installation compatible with their charger | Removes the plug-and-receptacle connection | Removing or relocating it involves electrical disconnection |
| Plug-in | Homeowners whose charger and suitable circuit support a receptacle connection | Allows the charging unit to be unplugged | Requires the correct receptacle, circuit and protective devices |
Ask which connection method suits the equipment and site before comparing schedules. Choosing plug-in equipment does not remove the need for electrical assessment or make an unsuitable outlet acceptable.
Will my power be off during installation?
Electrical work can require circuits or the electrical supply to be switched off for safe installation. Ask which part of the home will be affected and have the electrician confirm the planned interruption before the appointment.
Tell the contractor about medical equipment, home-office requirements, refrigerated medicines or other essential loads. Make a separate continuity plan instead of assuming the installation will leave every circuit energized.
If your home has solar or battery backup, disclose that equipment before work begins. An EV charger installation does not automatically make vehicle charging available during an outage; backup operation depends on the system design and supported loads.
When can I charge after the electrician leaves?
You can begin charging when the installation is safe, tested and cleared for use under the requirements that apply to the project. Physical mounting alone is not the completion standard.
Ask the installer to demonstrate a charging session with your vehicle where practical. The handover should explain the configured charging current, any charging schedule and what to do if the equipment reports a fault.
For a 2026 handover, request the relevant equipment documents and inspection information, where applicable. Keep those records with your home’s electrical documents rather than relying on a verbal explanation.
What should I prepare before booking installation?
Give the contractor information that supports a real scope of work. You do not need to diagnose your panel or choose a breaker yourself.
- Show the parking location. Explain how you normally park and where the vehicle’s charging port sits.
- Identify the equipment. Share the charger model and vehicle details if selected; otherwise, say that selection is still open.
- Describe the route. Flag detached garages, finished rooms, exterior runs or paving between the panel and parking space.
- Explain your charging needs. Discuss your driving routine and when the vehicle is normally home.
- Disclose other electrical projects. Include planned solar, battery backup or additional vehicle charging.
- Clear the agreed work area. Follow the contractor’s access instructions without opening electrical equipment yourself.
Alpha Solar Solutions offers EV charger installation as well as residential solar and battery backup. Its local team can discuss a custom system design and support after installation; your consultation should still establish the project-specific schedule and responsibilities.
Plan your home charging installation
Discuss your parking location, electrical work and scheduling questions in a free consultation.
What should the written schedule include?
Ask for milestones you can check, not just an appointment window. A useful schedule distinguishes the installer’s commitments from approvals or coordination that another party controls.
Your 2026 proposal should make these points clear:
- What assessment must happen before the installation date is confirmed.
- Whether circuit installation, panel work and any groundwork are included.
- Who handles required permit applications and inspection arrangements.
- Whether the appointment includes testing and a user handover.
- What event marks completion and permission to begin charging.
Also ask how changes will be communicated if the site assessment reveals additional work. A conditional date with clearly stated dependencies is more useful than an unconditional promise that ignores them.
FAQ
Can a Level 2 EV charger be installed in one visit?
A single installation visit is possible when the electrical scope and required arrangements allow it, but it is not a universal promise. Confirm whether assessment, inspection and testing are included or handled separately.
Does a Level 2 charger need a new electrical panel?
A Level 2 charger does not automatically require a new electrical panel. An electrician must assess capacity, equipment condition and the proposed charging load before confirming the work.
Is installing a plug-in EV charger faster than hardwiring?
A plug-in EV charger is not automatically faster to install than a hardwired charger. Both need an appropriate circuit, and a plug-in installation also needs a suitable receptacle and required protection.
Can I use my dryer outlet for a Level 2 EV charger?
Do not assume a dryer outlet is suitable for an EV charger. Have an electrician assess the circuit, receptacle, equipment instructions and applicable requirements before connecting charging equipment.
Do I need to be home for EV charger installation?
Arrange access with the contractor before the appointment. Confirm whether someone must be present for electrical shutdowns, equipment decisions and the final charging demonstration.
Will solar panels keep my EV charging during an outage?
Solar panels alone do not establish that your EV charger will operate during a grid outage. Backup charging depends on the electrical design, available energy and which loads the backup system supports.
What should I ask an EV charger installer about timing?
Ask for separate milestones for assessment, electrical work, required approvals and first use. Also ask which milestones the installer controls and which depend on another party.
One last thing
Check the cable reach with the vehicle in its normal parking position before the mounting location is finalized. A convenient wall position is not necessarily a convenient charging position.
Show the installer where the charging port sits and how people move through the space. Keeping the charging cable out of normal walking routes belongs in the layout discussion, not in a workaround after installation.
Related guides
- EV charger installation: hardwired versus plug-in
- Two cars sharing home charging
- Planning solar panels for a future EV